

Background
This project is my journey to building a mechanical keyboard that I enjoy using on a daily basis. It’s an extension of a materialistic tendency of mine, having the things I own and now create show off who I am.
I just wanna be COOL.
I also wanted a new mechanical keyboard and I have to do things in the biggest ego feeding way. Easy Peasy. Overall this project is a pretty major milestone in a few ways for me, so thanks for stopping by!
First Go Around
Now that I’ve justified the hours I’ve dropped into this, let’s start with the begining of the project. I ’ve got a lot of hours in just researching keyboards. I’ve got my inspiration, and a rough idea of features. I specced a keyboard split in half, tactile switches, rotary encoder for pc volume, with a ergonomic layout. All as cheap as I could reasonably could get.
First mistake I made is trying to build everything as cheap as possible. I think I’ve just got to learn that lesson a few more times. I started designing my first keyboard board in the second half of 2019, with the goal of having my keyboard done within a few months 🙃
To sidestep doing absolutely everything from scratch, I began with a kicad project from another open source project. A majority of what I borrowed was from the Corne keyboard. I was also able to utilize a lot of cool ideas on from the Corne, such as a reversible board and footprints to reduce the amount of unique pcb orders by half, and using a system of m4 screws and nuts as adjustible feet. From there I added microcontroller breakout footprint on each side, 3.5mm jack for communication between boards, added a knob for knob stuff, and rerouted all the switches in a matrix layout back to the brains.
Board all done
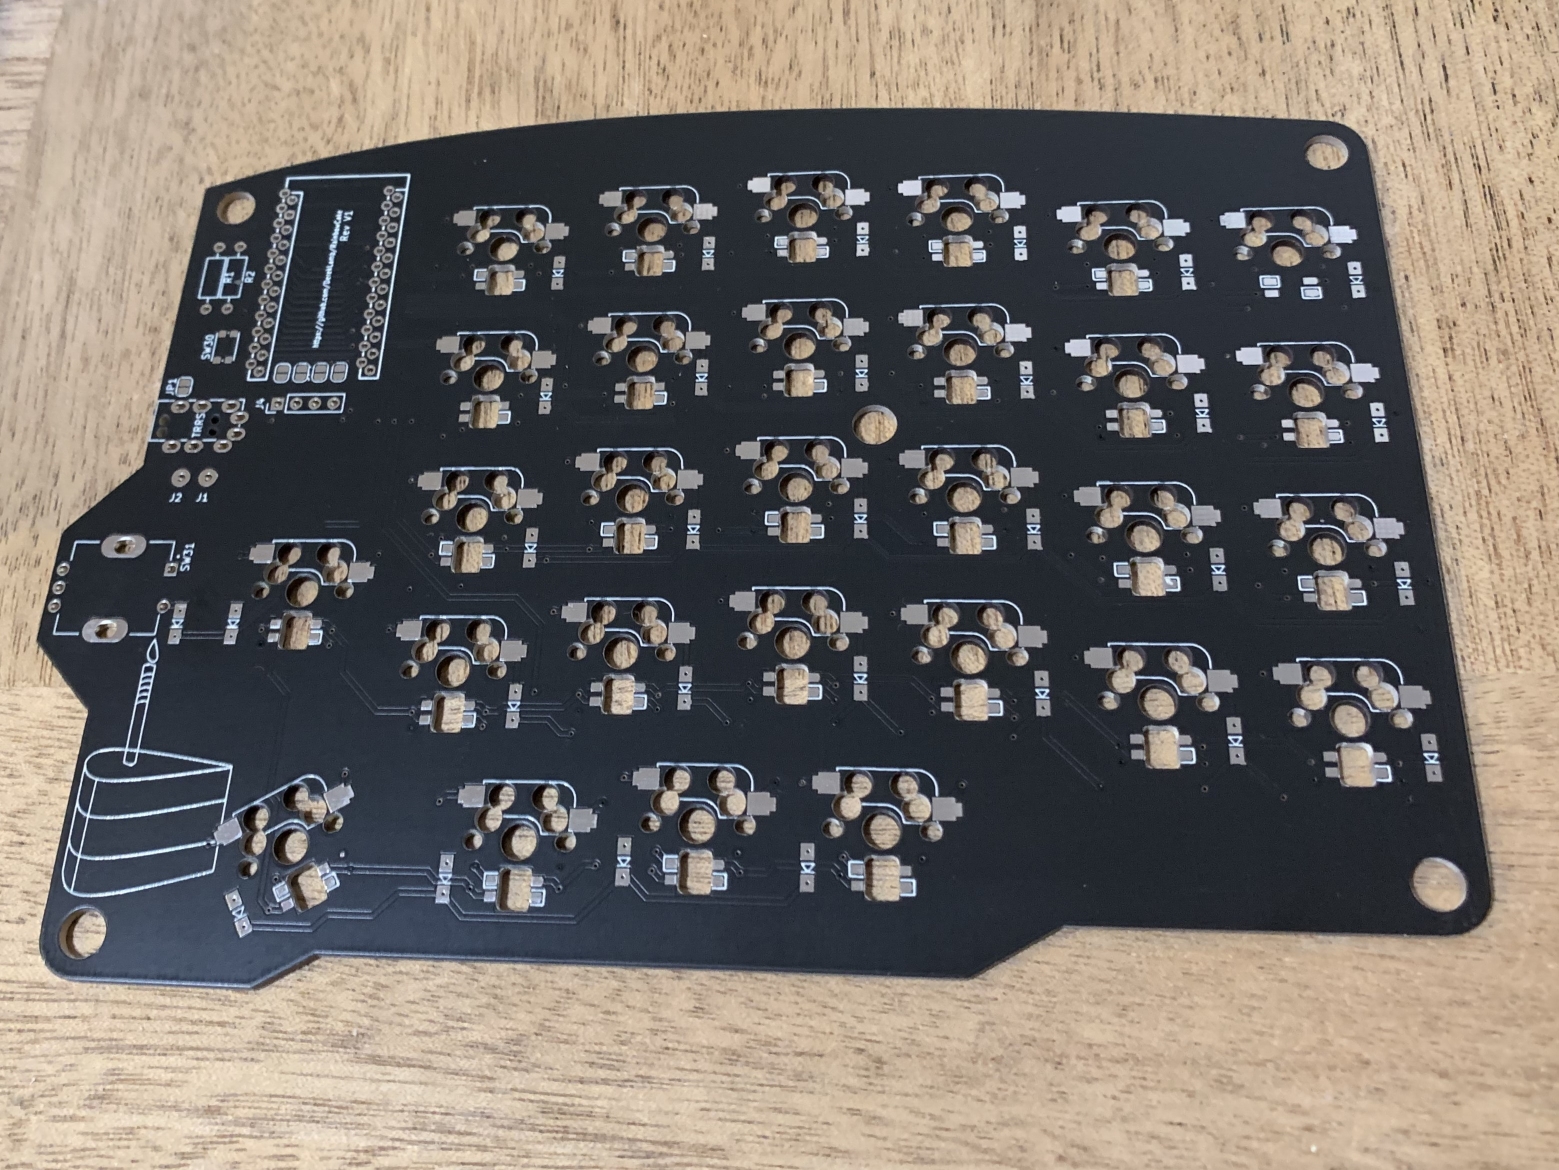
I named it after what it looked like, a sillouette of a slice of cake. The RGBCake was finished and sent off. It ultimately sat on the back burner longer than I wanted but I had a pcb at my door late December. Getting a PCB project after a couple weeks is just like Christmas. The boards looked great in a black finish.
I also ordered my parts around the same time, I went with a cheap set of gateron brown switches, a basic pudding cap key cap set, and soldered on my bill of materials from digikey. It took a few more weekends before I had time to finish soldering but I finally did, beginning of 2020. It was great to finally have said keyboard done! It looked slick and minimal with a bare black pcb with a white silkscreen.
And I hated it
It didn’t help that this was my first keyboard. It came out somewhat flimsy and not nice to use. I probably had 60 dollars worth of materials at this point, which is pretty cheap in the world of one-off custom mechanical keyboards. But past all the issues with design, I really did not like the layout.
Layout is learned personal preference and I’m not a fan of Ortho. Ortho is popular among split keyboards currently, but in the end there was too much I didn’t like to fight through intitial discomfort. Maybe I’ll give it another shot but I do better with the typical staggered. As the first prototype the keyboard itself was pretty mediocre. It was just discouraging to be disappointed in a milestone on a project, so I dropped this project.
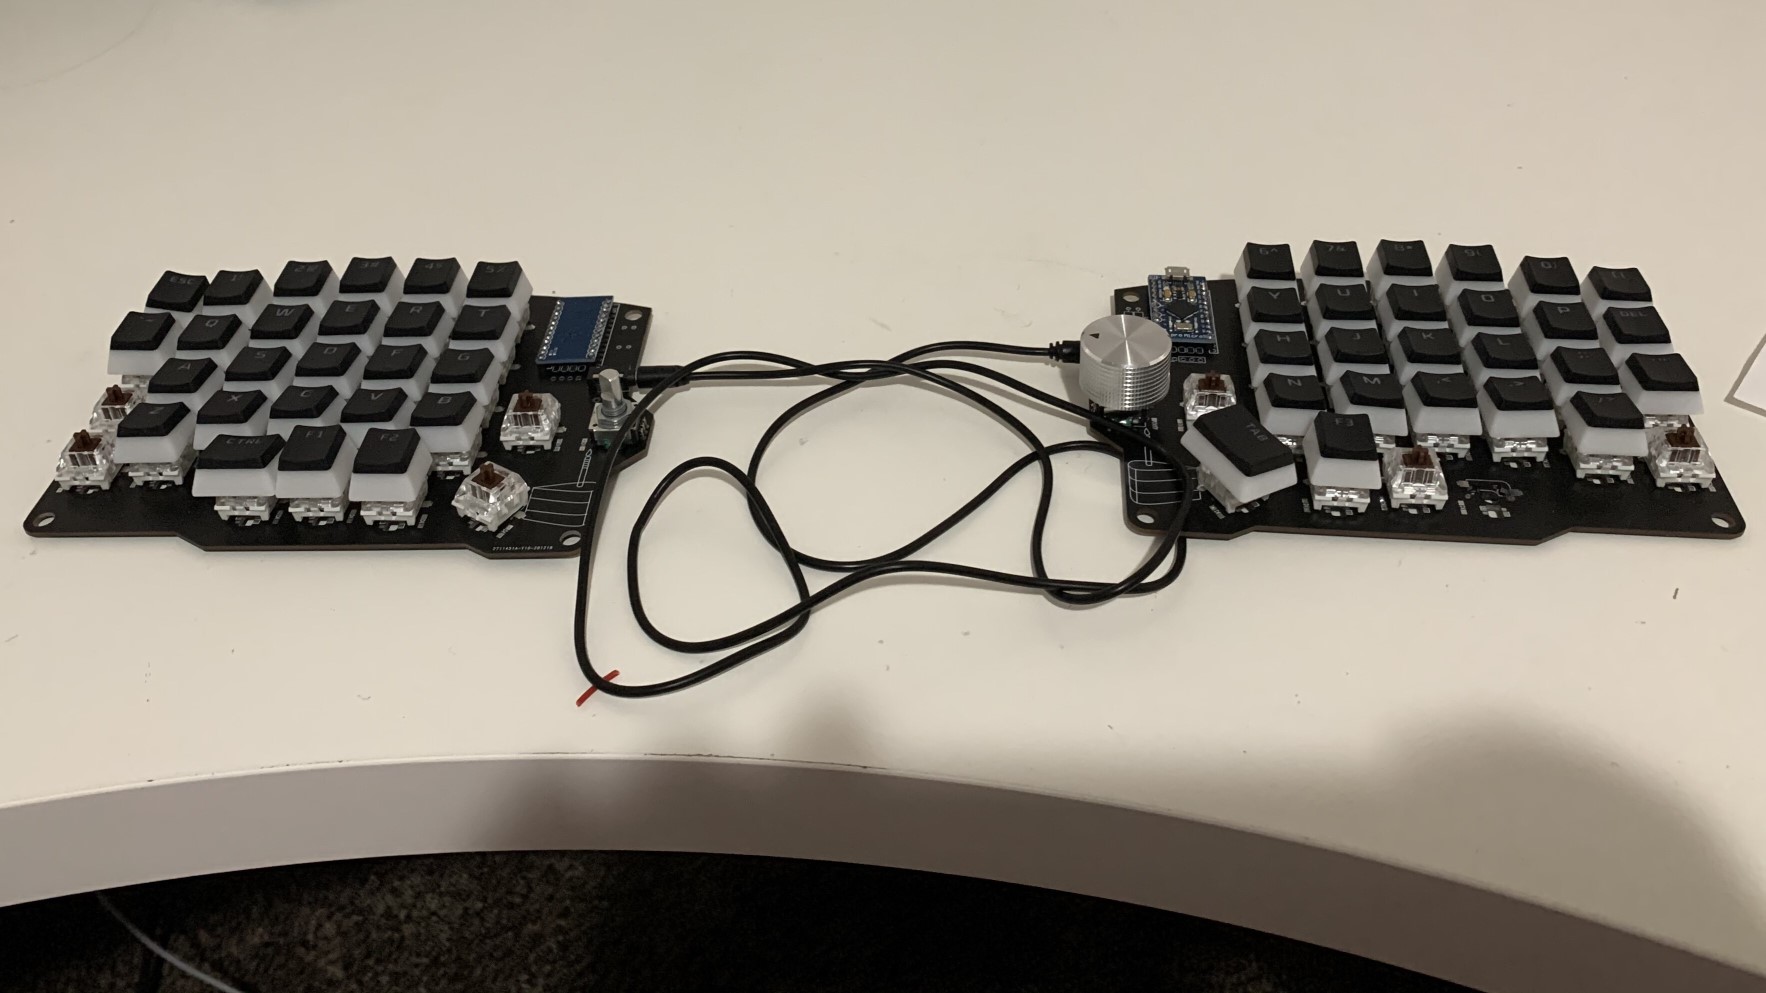
Eventually I did decide to make a v2 of the keyboard. On top of improving said things, I picked up a new desire to do more low level stuff, and keyboards are great for that. If you aren’t familliar, QMK is a really comprehensive customizable keyboard firmware. I could do more lower level stuff but not worry about having to do everything ground up. Previously since I shared the key layout as the corne, I just had to modify pin and matrix layouts, the rest was the same. This time I knew what I wanted more, now being a little more experienced with it all. I started from scratch, using a more traditional 60% layout, a single unit instead of split. I used the keyboard layout generator tool, which gave me a cad file and a layout in kicad. I did modify the default output to use a hotswap socket rather than soldered pins.
I think I’ve got commitment issues…
One thing I picked up from using my first split keyboard was multiple thumb keys, it was somewhere I liked having more keys. I use my thumb keys for layer keys, space, and shift. It’s a odd layout for a non split keyboard, but I like the shift under my right thumb. I brought the extra keys closer to me, I designed a full body 3d printed case for the pcb this time, adding some stability I was missing on my last keyboard. One thing that could have been done better was finishing one before the other. Mixing Kicad and Fusion 360 simultaneously did not go well. Start one and finish in the other. Also this time I put more of a focus on the smaller details. I added the MCU to the main board to clean up and let the board itself be smaller. I spent hours getting to know inkscape and styling silkscreen to match one of my favorite SciFi asthetics. It definitely took a long time before I finally decided I found one I prefer. Off to the pcb printing press.
It’s not at all visibile when assembled but in the end I’ve got a pcb that I’m pretty proud of. I named it Unit000.

The PCB arrived December 2021, 2 years after the first iteration. I ran into some issues assembling. One thing I didn’t mention until now, which you may have noticed, is I did actually design this board to be splitable. The two halves of the board are connected with mousebite sections meant to be broken in case that’s what you prefer. I wanted to be able to have a couple of different modes, since the minimum pcb order is 5. I really liked the idea of the feature to add some variance, but I have yet to build a split one. The main issue that came up was the pcb was due to slotted cut outs in the center allowing it to bend and warp. I wish I could have foreseen the headache coming my way.
Hello 2022!
Soldering the board was the headache. Most of it was hand soldered easily, luckily I’ve learned to steer clear of 0402 packages a long time ago. What did prove to be a pain was the MCU packaging. Due to the chip shortage I worked in a 32u4 qfn package that was a little easier to buy and little harder to solder. I have a hot air station and in the past I have soldered these before, so I didn’t think much of it. After soldering and unable to get anything to recognize on the usb port, or through the small debug port, I spent a few weekends trying to troubleshoot this circuit. Sucked with a capital S. Did get a new Oscilloscope for Christmas, that was a good way to start sniffing, and I got to know it pretty well. In the end there wasn’t an issue with said mcu package, or footprint, there was just enough of a warp in the board to stop the mcu from making a good connection with all pins. Removing all solder from the center ground pad, and adding more pressure when soldering fixed the issue. The board booted!
Here is the current state
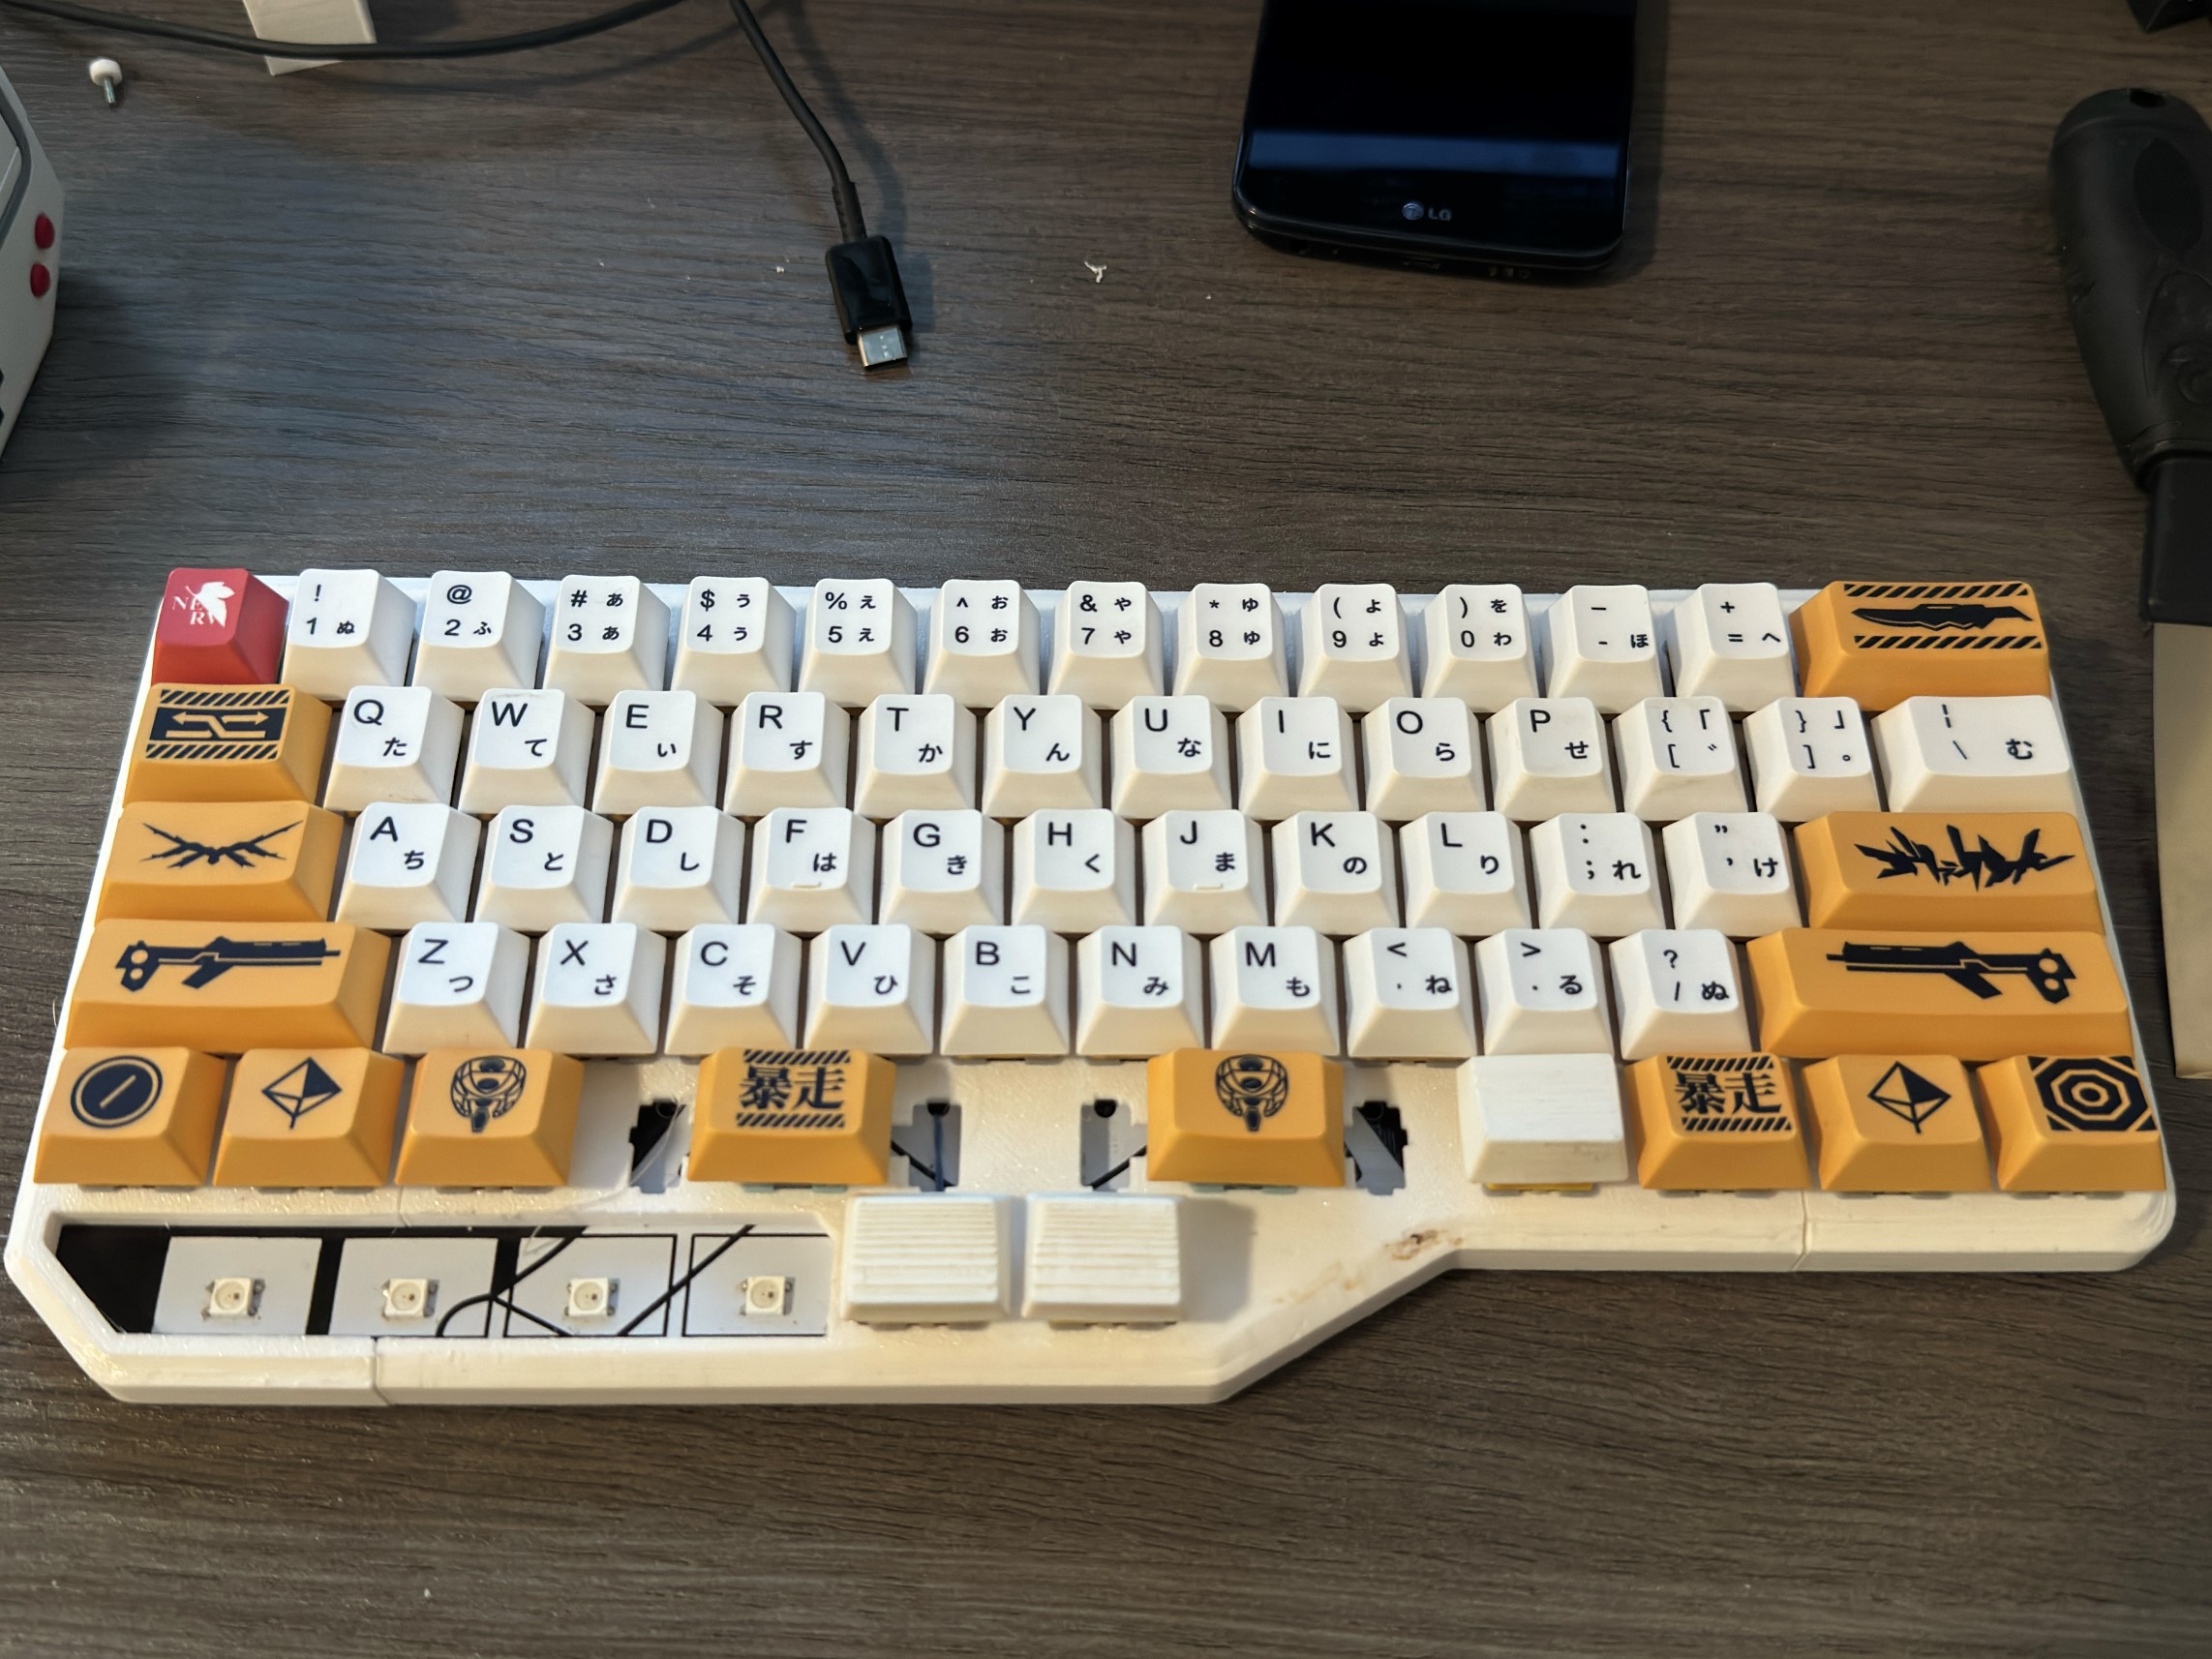
This time I ordered switches that were actually on the more expensive side of the spectrum. I found keycaps themed to my inspiration and switches to match. In the end I went from spending close to 10 cents a switch to 50 cents a switch Can’t say I regret it, they feel nice and fit the aesthetic well. I went with linear switches, which I liked much more compared to the previous switches I ordered. The aliexpress keycaps I found were also suprisingly good quality, but not great. The keyboard in the end looks good if raw, I prefer 3dprintcore. I’ve got some sanding and painting I need to do on the case, but I’m already pretty proud of it.
Once the fine detals are finished I’ll be done. I think I found a keyboard I can use for a long time. It’s become my preferred keyboard at this point.
One thing to note is there are a couple of bodge wires I had to add for switch connections. And I made a non reversible usb-c footprint… so improvements can defintely be made. If I feel the need the changes stack up, I’ll finish with a third iteration. Maybe even try cncing out the case out of aluminum instead of plastic.